

Docker is a platform for developing, shipping and running applications in lightweight, portable containers. Containers are isolated environments that package an application and its dependencies, ensuring consistency and reproducibility across different computing environments. Docker simplifies application deployment, scalability, and management by providing a standardized containerization solution that is widely used in modern software development and deployment pipelines.
The Need for Containers and Docker:
In the world of modern software development and IT operations, the need for agility, consistency, and efficiency has never been greater. Traditional methods of deploying and managing software often present several challenges:
Dependency Hell: Applications often rely on specific libraries, configurations, and runtime environments. When these dependencies clash or need to be updated, it can lead to compatibility issues, making software deployment a complex and error-prone process.
Inconsistent Environments: Software must run reliably in various environments, from developers' laptops to production servers. Achieving consistency across these environments can be a significant challenge, resulting in "it works on my machine" issues.
Scaling Challenges: As demand for services grows, scaling applications to accommodate increased workloads can be cumbersome. Traditional scaling methods may involve provisioning new servers, which is time-consuming and resource-intensive.
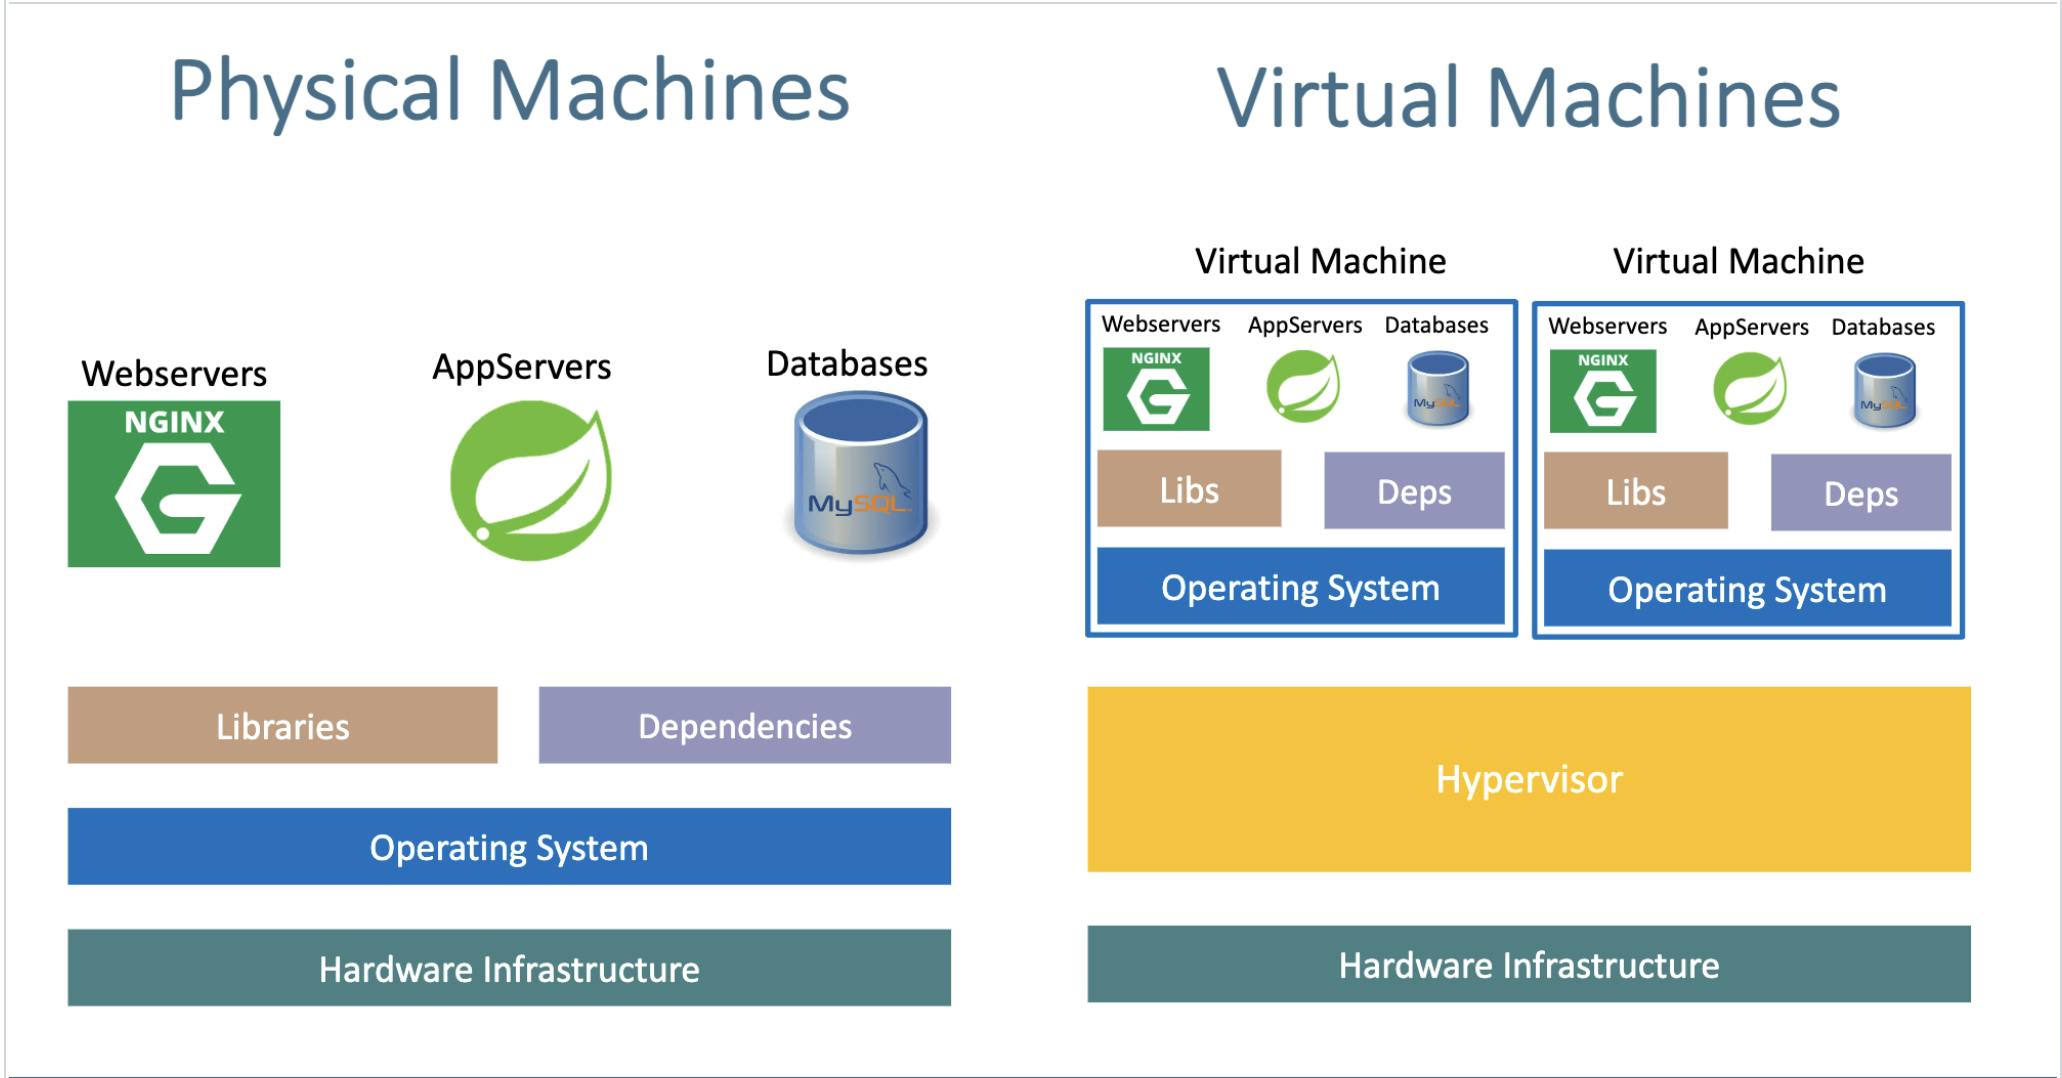
Resource Utilization: Virtual machines (VMs) provide isolation but consume substantial resources due to their operating systems. This inefficiency can lead to underutilized hardware and increased infrastructure costs.
Containers come to the rescue:-

Containers are lightweight, stand-alone, and executable packages that encapsulate an application and its dependencies. Think of them as self-sufficient units that contain everything needed to run your software, from the code and runtime environment to libraries and configurations.
The underlying technology:-
How are containers lightweight?
Containers are lightweight because they use a technology called containerization. This allows them to share the host operating system's kernel and libraries while keeping the application and its dependencies separate. This means they take up less space compared to traditional virtual machines since they don't need a full operating system. Docker containers are designed to be minimal, including only what's essential for the application to run, making them even smaller.
Let's check this with an example: the official Ubuntu base image, which you can use for your container, is shown in the screenshot. It's approximately 28 MB in size. Isn't that remarkably small? In contrast, if you were to consider the official Ubuntu VM image, it would be close to 2.3 GB. Thus, the container's base image is nearly 100 times smaller than the VM image.

The following provides a clearer perspective on the files and folders within container base images and the files and folders containers access from the host operating system:
Files and Folders in containers base images:-
/bin: contains binary executable files, such as the ls, cp, and ps commands.
/sbin: contains system binary executable files, such as the init and shutdown commands.
/etc: contains configuration files for various system services.
/lib: contains library files that are used by the binary executables.
/usr: contains user-related files and utilities, such as applications, libraries, and documentation.
/var: contains variable data, such as log files, spool files, and temporary files.
/root: is the home directory of the root user.
Files and Folders that containers use from the host operating system:-
The host's file system: Docker containers can access the host file system using bind mounts, which allow the container to read and write files in the host file system.
Networking stack: The host's networking stack is used to provide network connectivity to the container. Docker containers can be connected to the host's network directly or through a virtual network.
System calls: The host's kernel handles system calls from the container, which is how the container accesses the host's resources, such as CPU, memory, and I/O.
Namespaces: Docker containers use Linux namespaces to create isolated environments for the container's processes. Namespaces provide isolation for resources such as the file system, process ID, and network.
Control groups (cgroups): Docker containers use cgroups to limit and control the amount of resources, such as CPU, memory, and I/O, that a container can access.
"""
It's crucial to emphasize that while a container utilizes resources from the host operating system, it remains isolated from both the host and other containers. This isolation ensures that any modifications or changes made within a container's environment do not have any impact on the host system or other co-existing containers. Containers offer a secure and encapsulated runtime environment, allowing applications to operate independently without disrupting the broader infrastructure.
"""
Docker:-
Docker serves as a containerization platform, offering a straightforward method for containerizing applications. This entails the ability to construct container images, generate containers from these images, and seamlessly upload them to container registries such as DockerHub and Quay.io
"""
In simpler terms, containerization is a fundamental concept or technology, and Docker is the embodiment of containerization in practice.
"""
Docker Architecture:-
Docker follows a client-server architecture, where the Docker client communicates with the Docker server to manage containers and images. Here's a breakdown of Docker's architecture:
Docker Client:
The Docker client is the primary interface that users interact with. It accepts Docker commands from users and communicates them to the Docker server for execution. The client can be a command-line interface (CLI) or a graphical user interface (GUI).
Docker Server (Docker Engine):
The Docker server, often referred to as the Docker Engine, is responsible for managing containers and images. It consists of several key components:
Docker Daemon: This is a background service that runs on the host system. The Docker daemon is responsible for building, running, and managing containers. It listens for Docker API requests and carries out the requested actions.
REST API: The Docker daemon exposes a REST API that allows communication between the Docker client and the server. Users issue Docker commands to the client, which, in turn, sends HTTP requests to the server's REST API for execution.

The illustration above clearly highlights that the Docker Daemon serves as the core of Docker's functionality. In a playful tone, one might jest that if the Docker Daemon were to be terminated or stopped for any reason, Docker's essential functions would come to a halt, akin to a momentary "brain freeze." (pun intended.)
Docker Images:-
Docker images are lightweight, stand-alone, and executable packages that contain all the necessary code, libraries, and dependencies required to run an application. Images are read-only and serve as templates for creating containers.
Docker Containers:-
Containers are instances of Docker images. They are runnable and isolated environments that encapsulate an application and its dependencies. Containers run on the host's operating system but have their own isolated file systems, processes, and networking.
Docker Hub and Registries:
Docker Hub is a cloud-based repository where users can find and share Docker images. Docker registries are similar repositories where organizations can store and distribute their Docker images. Docker images can be pulled from these registries to create containers.
Networking:
Docker provides various networking options, allowing containers to communicate with each other and the external network. Docker supports bridge networks, overlay networks for swarm mode, and custom networks for different use cases.
Storage:
Docker offers storage management options, including volumes, to persist data generated by containers. Volumes are a way to store and share data between containers and between containers and the host system.
Docker hub:-
Docker Hub is a cloud-based repository and platform where individuals and organizations can discover, share, and distribute container images. It serves as a central hub for the Docker community to store and access Docker images, making it easier to find and deploy containerized applications and services. Docker Hub provides both public and private repositories, allowing users to publish and share images publicly or restrict access to authorized users within their organization. This platform plays a crucial role in simplifying the distribution and collaboration of containerized applications.
Docker installation:-
https://docs.docker.com/engine/install/
Dockerfile:-
A Dockerfile is a script used to create a Docker image. It contains a set of instructions that Docker uses to build an image, which can then be used to create containers. Here are some common Dockerfile commands and instructions:
| Command | Description |
FROM | Specifies the base image to build upon. |
LABEL | Adds metadata as key-value pairs to the image. |
RUN | Executes commands in a new layer and commits the results. |
COPY | Copies files/directories from the host to the container. |
ADD | Like COPY, but can handle URLs and auto-extracts archives. |
WORKDIR | Sets the working directory for subsequent instructions. |
EXPOSE | Informs Docker of the network ports the container listens on. |
ENV | Sets environment variables within the container. |
CMD | Provides default command/arguments for executing a container. |
ENTRYPOINT | Specifies the command executed when the container starts. |
USER | Sets the user or UID for running processes in the container. |
VOLUME | Creates a mount point for externally mounted volumes. |
ARG | Defines build-time arguments passed with --build-arg. |
ONBUILD | Executes instructions when this image is used as a base. |
ENTRYPOINT vs CMD:-
The CMD instruction in a Dockerfile is used to provide default arguments for the main command that will be executed when a container is launched from the image. It allows you to define the initial behavior of the container, but it can be overridden by providing a different command when running the container. The CMD instruction is typically used to specify the executable and any default arguments required for the containerized application. When the container is started, the main command specified by CMD is executed, and any arguments provided at runtime will replace the default arguments defined in the Dockerfile. This flexibility makes CMD useful for customizing the behavior of containers based on the same image.
On the other hand, the ENTRYPOINT instruction in a Dockerfile defines the primary executable command that should be executed when a container starts. Unlike CMD, the ENTRYPOINT command is immutable, meaning it cannot be overridden by providing a different command at runtime. Instead, any additional arguments provided when running the container are treated as arguments to the ENTRYPOINT command. This makes ENTRYPOINT ideal for specifying the core functionality or entry point of the containerized application, ensuring that a specific command always runs when the container is launched. Combining ENTRYPOINT with CMD allows you to set a default behavior while still allowing users to customize the container's runtime behavior.
shell form vs exec form:-
Shell form: The shell form in Docker is a way of specifying instructions using a shell interpreter, typically /bin/sh or similar. In this form, the instruction and its associated command are combined into a single string, allowing you to leverage the features of the shell. This includes capabilities like variable substitution, shell operators (such as && and |), and redirection (e.g., > or >>). The shell form is often more human-readable and familiar to users with a background in shell scripting. However, it may introduce potential security risks if not handled properly, and it can lead to minor performance overhead due to the involvement of the shell.
DockerfileCopy codeRUN apt-get update && apt-get install -y package-name
CMD echo "Hello, $NAME"
ENTRYPOINT ["/bin/sh", "-c", "echo Hello, $NAME"]
Exec Form: The exec form is a more straightforward way of specifying instructions in a Dockerfile. In this form, the instruction and its associated command are separated, and the command is provided as an array of strings. The exec form is less prone to issues related to shell interpretation and is generally considered more secure. It also results in a more efficient container startup, as it avoids the overhead of launching an additional shell process. The exec form is particularly recommended for instructions like CMD and ENTRYPOINT, where security and performance are crucial.
DockerfileCopy codeRUN ["apt-get", "update", "-y"]
CMD ["echo", "Hello, $NAME"]
ENTRYPOINT ["echo", "Hello, $NAME"]
DockerFile optimization:-
| Instruction             | Description                                    | Example                                      |
|-------------------------|------------------------------------------------|----------------------------------------------|
| `FROM`                  | Set the base image for your container.        | `FROM python:3.9`                            |
| `WORKDIR`               | Define the working directory inside the container. | `WORKDIR /app`                            |
| `COPY`                  | Copy files from the host to the container.    | `COPY requirements.txt /app/`                |
| `RUN`                   | Execute commands in the container during build. | `RUN pip install --no-cache-dir -r requirements.txt` |
| `ENV`                   | Set environment variables for the container.   | `ENV APP_ENV=production`                     |
| `EXPOSE`                | Specify which ports should be exposed.         | `EXPOSE 80`                                  |
| `CMD`                   | Define the default command to run when the container starts. | `CMD ["python", "app.py"]`          |

Organize your Dockerfile by following these steps:

1. Start with the `FROM` instruction to specify the base image. For example, `FROM python:3.9` sets up a Python 3.9 environment.

2. Use `WORKDIR` to set the working directory inside the container, providing clarity for subsequent commands. For instance, `WORKDIR /app` sets the working directory to `/app`.

3. Copy dependency files like `requirements.txt` using the `COPY` instruction, helping you install dependencies efficiently. Example: `COPY requirements.txt /app/`.

4. Use `RUN` to install dependencies or execute any commands required for your application. For instance, `RUN pip install --no-cache-dir -r requirements.txt` installs Python dependencies.

5. Set environment variables with `ENV`. For example, `ENV APP_ENV=production` defines an environment variable `APP_ENV` with the value `production`.

6. If needed, specify exposed ports with `EXPOSE`. For instance, `EXPOSE 80` indicates that port 80 is exposed for communication.

7. Finally, use `CMD` to set the default command for your container. Example: `CMD ["python", "app.py"]` specifies that the container should run `python app.py` when started.

This organized approach optimizes your Dockerfile, making it efficient and easy to maintain. Adjust the examples and instructions according to your specific application and requirements.
Docker prune:-
In Docker, "prune" refers to a set of commands that you can use to remove various types of resources that are no longer in use, thereby reclaiming disk space and cleaning up your Docker environment.
| Command | Purpose | Usage |
docker container prune | Remove stopped containers. | docker container prune |
docker image prune | Remove dangling (untagged) images and free up disk space. | docker image prune |
docker volume prune | Remove unused volumes not attached to any containers. | docker volume prune |
docker network prune | Remove unused networks. | docker network prune |
docker system prune | Remove all unused data, including containers, images, volumes, and networks. | docker system prune |
docker system prune -a | Remove all unused data, including containers, images, volumes, networks, and even all stopped containers. | docker system prune -a |
docker system prune -f | Force the pruning without requiring user confirmation. | docker system prune - |
viewing logs:-
| Description | Command | Example |
| View logs for a running container | docker logs <container_name_or_id> | docker logs my_container |
| View logs for a stopped container | docker logs <container_name_or_id> | docker logs my_stopped_container |
| Tail logs in real-time (follow) | docker logs -f <container_name_or_id> | docker logs -f my_container |
copying files b/w host and container:-
| Description | Command | Example |
| Copy files from host to a container | docker cp <local_file_path> <container_name>:<container_path> | docker cp index.html my_container:/app/index.html |
| Copy files from a container to the host | docker cp <container_name>:<container_path> <local_file_path> | docker cp my_container:/app/output.txt ./output.txt |
| Copy files between two containers | docker cp <source_container>:<source_path> <target_container>:<target_path> | docker cp source_container:/app/data.txt target_container:/app/data.txt |
Docker Commands:-
https://padmanabha.hashnode.dev/docker-commands
The Challenge with Traditional Docker Builds:-
When building Docker images for containerized applications, we often encounter several challenges that can impact image size, security, and build efficiency. These challenges arise from the conventional approach of building Docker images in a single stage, where the entire application, including build tools and dependencies, is bundled into the final image. Here are some common issues faced with this approach:
Large Image Sizes: Traditional Docker builds result in large container images. These images include not only the application code and runtime dependencies but also build tools, development libraries, and intermediate files. As a result, the images become bloated and consume unnecessary storage space.
Security Concerns: Large Docker images present an expanded attack surface, increasing the potential for security vulnerabilities. Including development tools and libraries in production images poses a security risk, as they may contain unpatched or unnecessary components.
Slow Build Process: Building large Docker images can be time-consuming, especially when working with substantial codebases. Developers spend more time waiting for images to build, hindering the development and testing workflow.
Complex Maintenance: Managing dependencies and updates in large images becomes complex and error-prone. Keeping track of version compatibility and ensuring that no extraneous files are included in the image can be challenging.
Wasted Resources: Since the entire build process takes place in a single stage, developers often use more resources than necessary, both in terms of storage and computing power.
Introducing Multi-Stage Docker Builds:-
To address these challenges, Docker introduced multi-stage builds. This feature allows you to create more efficient and smaller Docker images by using multiple build stages in a single Dockerfile. This feature is particularly useful when you have a complex build process or when you want to minimize the size of your final Docker image. Here's how multi-stage Docker builds work and how to use them:
Multiple Stages in Dockerfile: In a multi-stage build, you define multiple build stages within a single Dockerfile. Each stage is essentially a separate build environment with its own set of instructions. Stages are defined using the AS keyword.
Copying Files Between Stages: You can copy files or directories from one stage to another using the COPY command. This allows you to selectively include only the necessary files in the final image.
Final Image: The final stage in the Dockerfile represents the resulting Docker image. This is the image that you'll use to run your application.
Benefits:
Smaller Image Size: You can include only the necessary files and dependencies in the final image, resulting in a smaller image size.
Security: Unnecessary build tools and dependencies are not included in the final image, reducing the attack surface.
Cleaner Builds: You can keep the build environment isolated from the runtime environment.
Example:-
Here's an example of a multi-stage Dockerfile for a Python application:-
# Stage 1: Build the application
FROM python:3.9 as builder
WORKDIR /app
COPY requirements.txt .
RUN pip install --no-cache-dir -r requirements.txt
COPY . .

# Stage 2: Create the final image
FROM python:3.9-slim
WORKDIR /app
COPY --from=builder /app /app
CMD ["python", "app.py"]
Stage 1 (builder): This stage uses the official Python image as a base and installs the application's dependencies. It copies the application code into the image.
Stage 2: This stage uses a slim Python image as a base and copies the application and its dependencies from the builder stage into the final image. This results in a smaller image that only contains the runtime components necessary to run the application.
Distroless Docker Images: Enhancing Security and Efficiency:-
Docker images typically rely on a base Linux distribution (such as Ubuntu, Alpine, or Debian) to provide essential system libraries and utilities. However, this approach has some drawbacks, particularly in terms of security and image size. This is where "distroless" Docker images come into play.
The Problem with Traditional Linux Distributions:-
In traditional Docker images, a full-fledged Linux distribution is used as the base layer. While this provides flexibility and ease of development, it introduces several challenges:
Security Vulnerabilities: Traditional Linux distributions include a wide range of packages, many of which may not be needed for your application. Each package potentially introduces security vulnerabilities that need to be patched and maintained.
Large Image Sizes: Docker images based on traditional distributions tend to be relatively large due to the inclusion of numerous files, libraries, and utilities. This can lead to slower image pull times and increased storage requirements.
Attack Surface: A larger number of installed packages means a larger attack surface for potential threats. Unused or unnecessary packages can be exploited if not correctly managed.
Introducing "Distroless" Docker Images:-
"Distroless" Docker images are a lightweight alternative that addresses the shortcomings of traditional Linux distributions in the context of containerization. These images are designed with the following key principles:
Minimalism: Distroless images include only the essential runtime dependencies needed to run your application. They exclude unnecessary packages, tools, and libraries.
Security: By reducing the number of components, "distroless" images minimize the attack surface and reduce the risk of vulnerabilities. They are less likely to contain outdated or unnecessary software.
Image Size: Distroless images are significantly smaller than their traditional counterparts. This leads to faster image pull times and reduced storage requirements.
Optimized for Containers: "Distroless" images are optimized for containerized applications, emphasizing isolation and security without the overhead of a full Linux distribution.
Docker bind mounts and volumes:-
Bind Mounts:-
Bind mounts in Docker allow you to directly map a directory or file from your host machine into a running container. This means that changes made to files or directories within the bind-mounted path are immediately visible both on the host and inside the container. Bind mounts are a great choice for development scenarios, where you want to edit code or configuration files on your host machine and have those changes reflected in the container without the need to rebuild the image. This real-time synchronization is particularly handy for debugging and testing applications within a containerized environment. When creating a bind mount, you use the -v or --volume option when starting a container, specifying the host path and the container path you want to share.
Suppose you have a web application codebase on your host machine at /myapp that you want to run in a Docker container. You can use a bind mount to share this directory between your host and the container. Here's how you can do it:
docker run -d -p 80:80 -v /myapp:/app my-web-app-image
Volumes:-
Docker volumes offer a more abstract and managed way of persisting data between containers and surviving container restarts. Volumes are managed by Docker itself and are isolated from the host's file system. They provide features like snapshots and automatic cleanup, making them suitable for scenarios where you need long-term data persistence or when sharing data between multiple containers. To create a Docker volume, you can use the docker volume create command or implicitly create one by specifying a volume name when starting a container using the -v option without a host path. Volumes are particularly valuable for databases, where you want to store data independently of the container's lifecycle, ensuring that data remains intact even if the container is removed or replaced. They also make it easy to share data among multiple containers, facilitating microservices architectures and data sharing between containers in a controlled and organized manner.
Let's consider a scenario where you want to run a PostgreSQL database in a Docker container and ensure that data persists even if the container is removed or replaced. You can use a Docker volume for this purpose:
docker volume create pg_data
docker run -d -p 5432:5432 -v pg_data:/var/lib/postgresql/data postgres:latest
Docker Networking:-
Docker networking is a fundamental aspect of containerization that enables communication between Docker containers, as well as between containers and the external world, including other containers, the host system, and external networks such as the internet. Docker provides several networking options to facilitate these interactions. Here are some key aspects of Docker networking:
| Networking Option | Description |
| Default Bridge Network | Automatically created bridge network (bridge) for basic container-to-container communication within a single host. |
| Custom Bridge Networks | User-defined bridge networks for isolating and organizing groups of containers. |
| Host Network | Containers share the network namespace with the host, useful for performance-critical applications but may result in port conflicts. |
| Overlay Network (Swarm) | For Docker Swarm, overlay networks span multiple hosts, enabling communication between containers on different hosts. |
| Macvlan Network | Containers directly attached to physical network interfaces on the host, each with its own MAC address. |
| External Network | Containers connect to external networks like the local network or the internet. |
| DNS Resolution | Docker provides DNS resolution for container hostnames, allowing containers to use names as DNS entries. |
| Port Mapping | Mapping of container ports to specific ports on the host for external access to container services. |
| User-Defined Networks | Custom networks with configurable subnets and gateway configurations to meet specific requirements. |